Tuesday, November 30, 2010

Sufganiyot

Hannukah starts tomorrow night, and in anticipation of the holiday I wanted to bring a dish to potluck inspired by it. Usually we go with latkes, but a quick look in the pantry told me that I didn't have enough potatoes to make enough for the entire group. 

Instead I decided on sufganiyot - doughnuts traditionally eaten on Hannukah. Of course, I  then realized that if I made fried doughnuts at my house, that by the time it came to eat them they might be mushy or soggy from having been left sitting around. In my mind (and house) the best donut is a fresh doughnut

I scoured the web for a baked sufganiyot recipe, and came across one that seemed like it would turn out well. Having all the ingredients on hand helped solidify my decision and soon I had some yeasty dough proofing in the kitchen!


After letting the dough rise, I found myself with a helper in the kitchen. Apparently hearing the word "doughnut" is an easy way to get an extra set of hands, and I wasn't going to pass it up.


It didn't hurt that one of the first steps after letting the dough rise was to flour a cloth (which was super helpful. This was a very sticky dough!).


After making sure that every inch of the dough was covered in flour, we painstakingly rolled it out.


I didn't have a "doughnut cutter" that the recipe called for, and instead, we made do with a ball jar size glass. It seemed to do the trick, and I just kept making sure it was dusted with enough flour to prevent any sticking.


After letting the doughnuts rise again, we popped them into the oven. I found that they needed about 5 more minutes of cooking time than the recipe called for, but it was still a quick bake.

We coated half in cinnamon and sugar.


And half in sifted powdered sugar.


The end result was mixed. Truthfully - they were tasty. They really were. I mean, how bad can sweet dough topped with more sweet stuff be bad? Everyone at potluck had at least seconds or even thirds. However, these are nowhere near real sufganiyot. They ended up being more like delicious, sweet rolls. 

I thought I was being slick with baking them, but the whole point of sufganiyot is to fry them in oil. When we relayed the events of our day of doughnut making to my father later on that evening he said "those aren't doughnuts" - and you know, he was right. While a yummy dessert these baked "doughnuts" just didn't pass the Hannukah treat test. Hmm...I guess that means we'll just have to make them again, and this time we'll fry them! 

Monday, November 29, 2010

Soup-a-long: Week 3

I meant to have this blog up a day or two ago, but just never got around to it. Let's blame it on the post-Thanksgiving food coma I was in. Not a bad place to be, really...

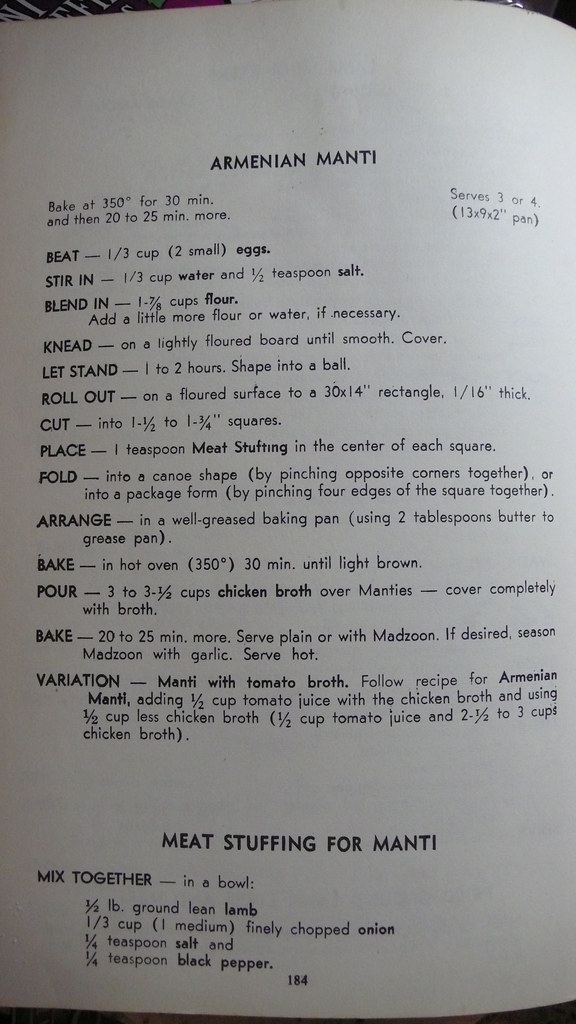
This week's soup-a-long's recipe is courtesy of my friend Emy. She told us all about this wonderful Armenian soup called Manti. To be fair, the first time she mentioned it, I snorted. It sounded horribly complicated and time consuming. In my mind, soup should be relatively easy to make with few steps beyond chop, dump and simmer.

All the various steps for Manti. Picture taken by Emy from the family cookbook she uses.
However, Saturday rolled around and Marc was at work all day; it was super chilly out, and I needed something to do. Manti sounded like the perfect idea. I started with the meat filling. That was the easy part. I defrosted some CSA ground beef (instead of lamb) and mixed it up with the onion, salt and pepper. I also added a little oregano for a bit more flavor.

Can you believe I actually gave up a chance at ground lamb at the last meat swap? I was like, what would I make with it. Oh, yeah: Manti. doh. Next time...
Getting the meat filling prepped was the easy part. Then it was on to the dough for the Manti. I used my beloved Kitchen Aid mixer to make the dough, and found myself adding more and more flour because the dough was incredibly sticky. After letting it sit for two hours I started the tricky process of rolling it out.

Again, I had to keep adding more flour, because if I didn't, it would just bunch up and get all hard to handle. I got a little nervous that the more I added flour the tougher the Manti would be, but the dough still rolled out pretty thin. Then, I grabbed a knife and eyeballed my grid for cutting up the squares of dough.
The photo came out slightly blurry, which seems apropos for how this whole endeavor went, really.
Once I got everything all filled up, I pinched them together and placed them in a greased baking dish. I have to be honest and say I googled around to see pictures of other people's Manti to see how mine fared in comparison. This is when I learned that most people use premade wonton wrappers which make their Manti pretty flawless looking. Mine...were not so much.


However, what they lacked in presentation, they made up for in flavor. Once I baked them a bit, then added the broth and baked them some more, my house started smelling fantastic. They came out bubbling from the oven and were ready to pop in a bowl. 


The tops of some of them were a little crispy from not having been fully submerged in the broth. That really wasn't an issue once they were all piled in a soup bowl. However, next time I'll definitely be making this with more broth so that they're soft all around. The combination of the dough and meatball inside was perfect. The meat cooked well and was incredibly moist while still being cooked all the way through. 

Everyone who tried it gave it the thumbs up, and despite it being a bit of a hassle with making my own dough, I will definitely be trying this again. It's a perfect, hearty soup for a cold day - it will warm up your house and your belly! 

Saturday, November 27, 2010

Birthday Potluck

The birthday girl, Sina, & Elijah
Whenever somebody's birthday falls near a Monday, it's always tradition to celebrate with a special dessert. This past Monday was no exception, when we all gathered to celebrate one of our potluck kids turning four.

The birthday girl happened to be Elijah's best friend Sina. Elijah and Sina are a month and a half apart, but have known each other since birth. They've grown up together and anytime there's a birthday, it always feels like a family celebration. Monday was no exception.

Sina's mother Hannah made a delectable chocolate cake (a sinfully delicious recipe from Smitten Kitchen) layered with freshly whipped cream frosting and strawberries. We arrived just as Hannah was frosting the cake - our timing couldn't have been any better. 

mmm...cake!

There was a little bit of leftover frosting, but we quickly figured out what to do with it.
Potluck appetizer? Maybe?
The final product turned out beautifully - and tasted just as awesome. The strawberries and fresh cream went perfectly with the moist chocolate cake.

nom. nom. nom.
The birthday girl was impressd as well and made sure to quickly grab a slice after ensuring that her candles were properly blown out. Of course, we all had to sing, and our voices loudly (and mostly on-key) filled the kitchen.


We all sat around, enjoying the cake and the evening. Everything else was delicious as well, but beyond the food, what really stuck out to me was the gathering of our friends in celebration. Being able to share these special moments in an intimate, familiar way like dinner, truly makes this group feel like a family.

Friday, November 26, 2010

Thanksgiving Bread

For the past two week, my son has been seeing a song that he's learned at school for their Harvest Festival. The song quickly became an ear worm, and I've found myself singing to myself at various points in the day.

Thanksgiving bread. <clap clap> We make it and we share it. And together as we eat it, let's be tha-a-a-a-a-a-a-a-nkful.

When my mother asked if I could bring some bread for Thanksgiving dinner, I thought - why don't we just make it? Clearly the spirit of the song (and holiday!) had gotten to me. But then I realized that whenever I make fresh bread (and we do - often - thanks to the easy to follow book Artisan Bread in 5 Minutes a Day) is really is best all warm and delicious straight out of the oven.

I had a feeling that oven space would be limited on Thanksgiving day (and I was right!) so I started thinking about what alternatives I could come up with. I ended up acquiescing and bought some excellent bread from a favorite local bakery, but still wanted to bring some in addition to the butternut squash & pear pie that I made (which, by the way, made an absolutely perfect breakfast this morning!).

I hopped on over to one of my favorite cooking sites - 101 Cookbooks and stumbled across a recipe for buckwheat cheese straws. After a quick trip to the store for some buckwheat flour, I assembled all the ingredients and got to work.
I love when recipes have only a handful of ingredients
I mixed the dough all up and popped it in the freezer as instructed. However, when I took it out a little while later, I was bummed to see that it had somehow gotten all crumbly. It was also hard as a rock and resisted all attempts at being rolled out flat, so I left it alone for a few minutes. When I came back, it still didn't want to be rolled, so I started slicing thin bits off and rolling them into logs.  

Ok. I'm a big cheater. I ended up using pre-shredded cheddar from a bag (hence the "golden" color
Despite the resistant nature of the dough, I ended up getting into a groove of cutting and rolling and the pre-baked logs seemed fine (albeit a little delicate). I baked them as directed and the house ended up smelling deliciously cheesy. When they were done, I couldn't help but snag a warm cheese stick - as a taste test of course.

While the buckwheat flour is a little dense, it worked well within this recipe and complimented the cheese and thyme nicely. Everyone seemed to enjoy them as well, especially my son who got a huge kick out of eating something that looked like a stick.

I'm not sure if the difficulty in rolling out the dough was just something done on my part or what, but we'll definitely be trying this recipe again, so I'll have plenty of opportunities to play around with it and see what happens next time.

So, while we didn't sit around sharing homemade Thanksgiving bread, perhaps we started a new tradition of thanksgiving cheese straws. Either way, there was definitely a lot to be thankful for yesterday, and I'm glad I was able to spend the holiday with my family.


Tuesday, November 23, 2010

A Twist on Thanksgiving

Since my mother will be hosting Thanksgiving this year, and I'll only be making a couple of dishes, I thought it would be fun to make a Thanksgiving inspired dish for potluck this week.
Why yes, this was delicious.

While browsing through the archives of Food Network (a favorite place to waste time), I came across this recipe for scalloped spicy sweet potatoes from Bobby Flay. I was on board immediately. Not only was I able to whip out and use one of my favorite kitchen gadgets (my mandolin) but I always enjoy a good spicy/sweet flavor combo - as long as it's not too spicy.

I bought some lovely looking Japanese yams, which I was assured were just like sweet potatoes.


Of course, when I cut into them, I noticed that they were an off white color, rather than the colorful orange you're used to with regular sweet potatoes.

Sweet potatoes...or are they?
Crossing my fingers that this wasn't going to be a problem, I continued on. Knowing that I'd mostly likely shy away from the dish if it was too spicy, I decided to slowly add the spice to the cream. 

That cream looks a bit jaunty, no?

Because it seemed like a smart idea at the time, I dipped my finger in to the chipotle peppers and tasted it to see exactly how spicy it was. 

Yikes. 

I immediately followed that up by dipping those same fingers into the bowl of cream. I added the chipotle puree bit by bit until the cream took on a light pink color and the entire kitchen smelled deliciously smokey. 

I placed one layer of sweet potato on the bottom of the pan (I used a 9 x 13 glass dish) and then decided that 2 cups of heavy cream just wasn't enough dairy and sprinkled a little bit of shredded cheddar cheese in between each layer of potato.


I popped the dish in to bake as directed and by the time it was done it had caramelized on the top and had a lovely looking crispy edge. In the end it was the perfect combination of sweet, savory and spicy. While it was certainly a heavy dish with all of the cheese and cream, you only needed a small slice to be satisfied. By the end of the night it was all gone, even the extra crispy bits around the edge. 

I'll definitely be making this dish in the future when I'm feeling the urge for a little twist on sweet potatoes.  

Monday, November 22, 2010

Counting on the Contessa

My mother is a huge fan of Ina Garten, who's probably better known as the Barefoot Contessa. I'm not sure what my mom loves most about Ina...her gorgeous house in the Hamptons, her seemingly effortless ability to throw together a dinner party or her to-die-for recipes. It also doesn't hurt that my mom actually got to meet Ina one night a few years ago, and despite wanting to gush and fawn over her, somehow just managed to inquire about her cute purse.


I happen to agree with my mother regarding all things Ina, and often find myself perusing through my Barefoot Contessa cookbook.


So, it only seemed fitting that when I invited my parents up to our house to celebrate my mother's birthday, that the Contessa featured somewhere in our dinner plans. I try not to extend myself too much when hosting a dinner party. There's that fine line between wanting to be a good hostess and putting out a perfect meal, but also enjoying your guests at the same time. In that vein, I try to choose recipes that will essentially cook themselves, but still turn out well.


Thankfully, the Barefoot Contessa seems to have a few of those up her sleeve. In addition to my own dishes of simple lemon and herb roasted chicken, green salad, cabbage, and roasted potatoes, I chose two dishes from Barefoot Contessa At Home to try out. Both came out beautifully.


The first was broccolini with a balsamic dressing and couldn't have been easier.


Ingredients
  • Kosher salt
  • 4 bunches broccolini (1 1/2 pounds)
  • 1/4 cup good olive oil
  • 11/2 tablespoons balsamic vinegar
  • 1/2 teaspoon Dijon mustard
  • 1 teaspoon minced garlic
  • 1/2 teaspoon freshly ground black pepper
  • 1 lemon
Directions
In a large pot, bring 8 cups of water and 2 tablespoons salt to a boil. Remove and discard the bottom third of the broccolini stems. If some stems are very thick, cut them in half lengthwise.


Meanwhile, in a small bowl, whisk together the olive oil, balsamic vinegar, mustard, garlic, 1 1/2 teaspoons salt, and the pepper. When the water comes to a full boil, add the broccolini, return to a boil, and cook over high heat for 2 minutes, until the stalks are just tender. Drain well and place in a large bowl. Pour enough dressingover the broccolini to moisten and toss well. Splash with a generous squeeze of fresh lemon juice, sprinkle with salt, and serve warm or hot.
 The second was a hearty and flavorful stewed lentils with tomatoes. 


My brother does not eat meat, so I always try to have something on hand that would be considered more of main dish than a side, and these lentil fit the bill. For some reason, cooking with curry always makes me a touch nervous, but this ended up being tasty without being overpowering and actually, was even better the next day! I can see this dish quickly becoming a winter staple in our house for sure. 


In all, the Contessa did not let me down, and as we sat around the table (listening to my mother's "how I met the Contessa" story for the 18th time) I think everyone else seemed to agree.  


And now...seeing as it's Monday, I'm off to raid the pantry in hopes of finding something tasty to whip up...

Thursday, November 18, 2010

Coconut Rice


Plain Brown Rice. No coconut...yet.

Rice is something that pops up in many of the meals we make here at home, either as part of a main dish or as a side. There are so many wonderful rice recipes out there, but what I've learned over the last few days is that rice - in its basic form - can also be wonderful.

After my stomach finally settled down enough to allow me to eat something solid, I turned to the familiar comfort of the B.R.A.T diet. After finishing up all the bananas and applesauce that we had in the house, I wasn't quite feeling up to toast yet, so I settled on the rice part.

I just wasn't sure if bland brown rice was going to be good. I wanted to at least enjoy what limited food I was eating if possible. However, there wasn't much I could think of doing with the brown rice that wouldn't have had my stomach stressing out.

Normally, if I am making a side of brown rice, my favorite way to do so is to bake it. It's quick, easy and for some reason tastes ten times better than simply cooking it on the stovetop. However, I also usually use a bunch of oil and chicken/vegetable broth with this method - so that was out.

Padding around my pantry, I looked to see what I could use, and stumbled across something that isn't normally there: coconut water.

Somebody had suggested that I drink some coconut water while ill, to replenish my lost vitamins, so I had my brother go out to the store and pick me up some. He came back with this:

Goya? Oh, Boya!

I wasn't quite sure that this is what my friend had in mind. I'm not completely clueless and have heard tell of fancy coconut water that people drink when they workout and such. I've just never actually had it. A quick google search proved me right, and my husband promised that he would bring back some of the "fancy" coconut water later that evening.

Perhaps the grown up juice box appeal makes it fancy? Still unsure.

In the end, I actually tried both, and the Goya is just as tasty as the fancy, $2.50/boxy bottle ones, so...(I'm sure somebody will point out the difference to me soon enough).

Either way, I still had a six pack of Goya in the pantry and needed to do something with it. For some reason, it made perfect sense for me to incorporate it into my rice (the fever had broken at this point, I swear!).

I went with the standard method of 1 cup of brown rice to 2 cups of liquid - only in this case I used 2 cups of coconut water. I passed on the usual pinch of salt and dash of either butter or oil I normally add, just in case my stomach wasn't quite there yet. I heated it up until it boiled, and then allowed it to simmer for almost an hour.

The end result was incredibly tasty. The rice was sweet, creamy and delicious, without being overly powerful. It was actually enjoyable to eat, rather than simple bland nutrition. Plus, it was kind of fun to find a little nibble of coconut flesh in every other bite.

As I ate, I started thinking of how I could use this newfound knowledge of coconut rice. I could add pineapple, cashews, chicken and a dash of curry powder. I could add raisins, cinnamon and milk for a little pudding action. It was at this point that I knew I was truly on the mend. 

Since I still have a couple cans of coconut water still lurking around, I'm sure I will test out some of these ideas and see what I come up with. Hopefully these ideas will end up working just as well!